 |
| Rosettes My Friend card |
The basic rosette was die cut with Tim's rosette die using the larger shape, Then they were embellished.
 |
| detail of misted Distress bkgr'd & tissue tape on rosette. |
For the 3 landscape cards I used my metallic papers I picked up recently mentioned in a previous post. Still love them and will pick up more at the end of the month.
 |
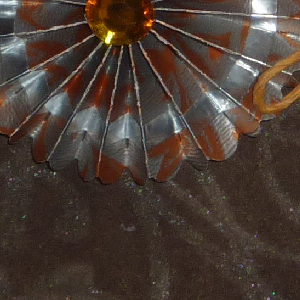
| Brown rosette T of You card |
One of the hints in a previous class was to put a piece of tape on the backside after die cutting to prevent the perforated areas from breaking apart. Was a really good tip. For the brown, and for the aqua rosette the tape was put on the front - on the brown with a piece of narrow silver tape, and the aqua one with a piece of Tim's sticky tissue tape.
 |
| detail of silver foil rosette and pearl misted bkgrd |
The green rosette was die cut, taped on back and then holes punched along the whole scalloped edge, then accordion folded. I really liked the way this looked, so went one step further. Colored a piece of thin cardstock, punched the edge with Martha Stewart Double Loop edger, then scored my folds with a Scor-It board then accordion folded. The edge of that card uses the same punch. What I like about this one is the ruffle you get on the edge.
 |
| Green Rosette Thanks card |
Some of the techniques:
Direct to paper with a Distress stamp pad, then mist a background stamp with water or an iridescent spray, place cardstock on top, press down firmly for a minute or so to activate the moisture in the stamp with the Distress inks. Lift, You can get a soft look and/or a glimmery look where the mositrue is removing color from the cardstock.
 |
| Detail of punched holes rosette & misted stamped border and vellum |
 |
| Rosette Get Well card |
Ink up a background stamp (Flourishes "Damask Bkgr'd") with distress stamp pads - I used Antique Linen all over, then touched here and there with both Broken China & Rusty Hinge, Lightly misted with Perfect Pearls "Pearls" mister. I absolutely love this combination and the look it gave. You could also color with watercolor markers which also give a nice look, but haven't done a sample of that yet.
Another cute tip (green rosette card) was using a circle punch to make leaves. Instead I used a scalloped circle. Punch circle, then put circle part way back in to punch and punch the oval leaf shape.
 |
| Border Punched Rosette detail |
All cards use a word sentiment from
Quietfrie Design.
And I repeated a technique for day 3 I think, embossing on plastic (I used a yellow toned vellum & the D'vine Swirls embossing folder).


No comments:
Post a Comment