Showing posts with label Dreamweaver. Show all posts

Friday, May 29, 2020

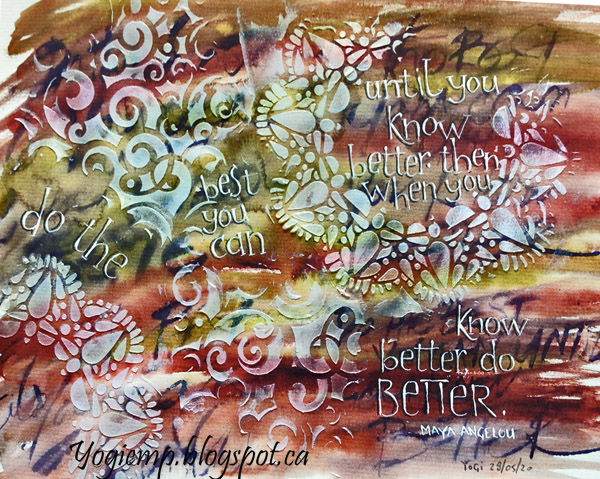
Wk 22 - Maya Angelou - Do The Best You Can

http://www.yogiemp.com/Calligraphy/Artwork/ScribbledLives2020/ScribbledLives_May2020.html

On the Scribbled Lives 2020 facebook group the challenge this week is to use a quote from Maya Angelou. 

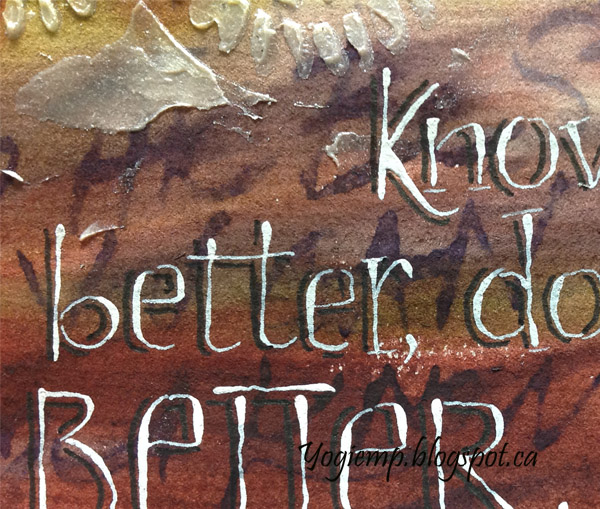
http://www.yogiemp.com/Calligraphy/Artwork/ScribbledLives2020/ScribbledLives_May2020.htmlI had been doing some practice calligraphy on Strathmore Charcoal paper which I didn't like so decided to see what would happen if I did... I really like the end results.

Click on any image to see all the details and descriptions etc. Enjoy.

http://www.yogiemp.com/Calligraphy/Artwork/ScribbledLives2020/ScribbledLives_May2020.html

Tuesday, June 11, 2019

June/19 - ATCAD2019 - ATC Crackle Paste Live Love Laugh - Day 9, 10 & 11

Well here are the ATC's for day 9, 10 & 11. I'm just zipping along... BIG GRIN
 
These are more ATC's created from my raided stash of decorated papers that have been languishing in the drawer for probably 8 years... Every once in a while I check it, but it stays the same... What better use of them than for ATC's. Finally there are a few less in the drawer.

I'm using a bunch of dies "Live", "Love", "Laugh" from Elizabeth Craft Designs, also available on Quietfire Design  HERE, HERE, and HERE


I believe the crackle background was made using Golden's Crackle medium and Dream Weaver paste, then colored with a water coloring medium. I loved the effect, but it's really thick and not conducive to making greeting cards... so it languished in the drawer. It's really bright and cheerful.

I trimmed them down a bit narrower than an ATC and adhered them to a white cardstock base edge with a red Zig marker.

I die cut the words "Live", "Love", and "Laugh" from a dark blue metallic cardstock.


Friday, July 27, 2018

MC July/18 - Easel Coffee - ECD Happy Birthday - Coffee & Friends

http://yogiemp.com/HP_cards/MiscChallenges/MiscChallenges2018/MCJuly18_EaselCoffee_ECDHappyBirthday_Coffee&Friends.htmlI love COFFEE. I've been doing a couple hours a day of tidying up my worktable and some drawers in my towers... and in so doing have come across things I put aside eons ago.  This Dreamweaver 3 cups and the die cut frame (sorry have no idea what it is...). So I resurrected it. BIG GRIN. Also using the newest stamps from Suzanne - coffee and tea related. LOVE THEM

I'm using an A Way With Words dies  "Happy Birthday small"  from Elizabeth Craft Designs, also available on Quietfire Design HERE

I 'm also using a bunch of the newest stamps from Quietfire Design
("But First, Coffee" 8pce set); ("Tea & Thee" 7pce set); ("Happy Birthday Plain and Simple" 7pce set)


Click on any card image to see all the details and descriptions etc. Enjoy

And it fits for these challenges:
Dare and Diane  Tea or coffee
Penny's Challenges #390 anything goes
Simon Says Stamp Challenge  anything goes
The House That Stamps Built  J2518 anything goes
Seize the Birthday  Birthday with stripes

http://yogiemp.com/HP_cards/MiscChallenges/MiscChallenges2018/MCJuly18_EaselCoffee_ECDHappyBirthday_Coffee&Friends.html

Wednesday, October 19, 2016

MC Oct/16 - Winter Sky - ECD Brrrr - Warm Winter WIshes

http://yogiemp.com/HP_cards/MiscChallenges/MiscChallenges2016/MCOct16_WinterSky_ECDBrrrr_WarmWinterWishes.html
I was in a mood to do another wintry sky... 

http://yogiemp.com/HP_cards/MiscChallenges/MiscChallenges2016/MCOct16_WinterSky_ECDBrrrr_WarmWinterWishes.htmlI'm using an A Way With Words die from Elizabeth Craft Designs  "Brrrr"  also available on Quietfire Design HERE


I'm using a quote and sentiment stamp on the inside from  Quietfire Design  

Click on any image to see all the details and descriptions. Enjoy

And it fits for these challenges:
Crazy Hazelnut Challenge  monthly Oct  Anything Xmas
Fashionable Stampin  #116 trees
Crafty Sentients Challenge  anything goes
TTCRD  #18 - 24 anything goes


http://yogiemp.com/HP_cards/MiscChallenges/MiscChallenges2016/MCOct16_WinterSky_ECDBrrrr_WarmWinterWishes.html

Sunday, August 14, 2016

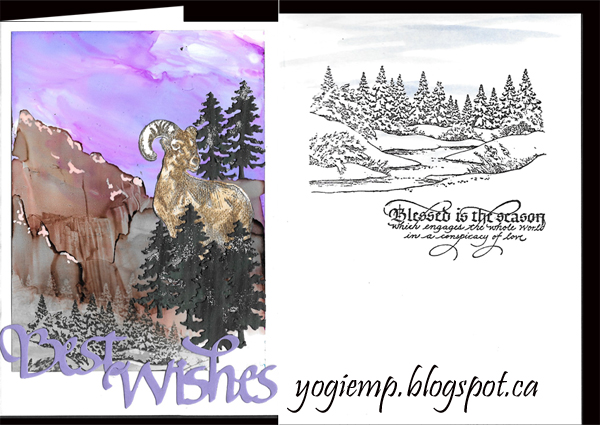
TH 103 Day 5 - Alcohol Landscape Painting Technique

http://yogiemp.com/HP_cards/MiscChallenges/MiscChallenges2016/TH103Day5_AlcoholScenic_ECDBestWishes.html
Finally getting around to doing another of the techniques from the Tim Holtz 103 class - Alcohol Landscape Painting Technique. I'm pleased with the results and it goes really fast... I worked on Yupo which is a really nice material to work on although it's not heat stable so embossing something is tricky...

http://yogiemp.com/HP_cards/MiscChallenges/MiscChallenges2016/TH103Day5_AlcoholScenic_ECDBestWishes.html
I'm using one of the earlier die release from Elizabeth Craft Designs A Way With Words "Best Wishes" also available on Quietfire Design HERE
http://yogiemp.com/HP_cards/MiscChallenges/MiscChallenges2016/TH103Day5_AlcoholScenic_ECDBestWishes.html

And I'm using quote stamps from Quietfire Design on the inside  ("Deep Within The Winter..." 2 pce set); ("Here and There The Dark..."); ("Blessed is the Season..."); ("International Merry Christmas" 6 pce set)

Click on any card image to see all the details and descriptions etc. Enjoy

And it fits for these challenges:
Creatalicious Challenge  #96 anything goes
Simon Says Stamp Challenge  go wild... (2nd entry)
The Sisterhood of Crafters  #60 Close to nature
Trimmie's Craft Challenge  #376 anything goes (2nd entry)
Brown Sugar Challenge  #211 anything goes
Jingle Belles Rock   Reindeer (ok not quite a reindeer... a Big Horn Sheep)
Polka Doodle Challenge  #32 anything goes


http://yogiemp.com/HP_cards/MiscChallenges/MiscChallenges2016/TH103Day5_AlcoholScenic_ECDBestWishes.html

Thursday, January 15, 2015

MC Jan/15 - Mixed Media - Have a Heart - HB

 http://yogiemp.com/HP_cards/MiscChallenges/MiscChallenges2015/MCJan15_MixedMedia_HaveAHeart_HB.html...and using another of the newest "Love" stamps "Have a Heart That Never Hardens" on the inside from Quietfire Design as well as a Happy Birthday - calligraphy eCut file available on the Silhouette on line store on the front.
http://yogiemp.com/HP_cards/MiscChallenges/MiscChallenges2015/MCJan15_MixedMedia_HaveAHeart_HB.html
This one is a mixed media style using pastes, Dreamweaver stencils, some of Tim's layering stencils, sprays, metallic Pan Pastels, rub n buff, acrylics, sheesh I'm getting tired just writing them all down... Die cuts, eCuts, lace/ribbon. stamping, more of my roses I made the other day from Gelli prints, stamping in color...

Ok you get the idea. You can see all the details and descriptions, as well as close ups etc by clicking on any card image. Enjoy

And it fits for these challenges:
Dreamweaver  monthly Jan  BD
Creative Cutting Challenge  #45 anything goes
Loves Rubber Stamps  #134 stamp in any color except black
Digi Stamps 4 Joy  #108 Bingo: die/punch, flower, stitch; heart, free, pearl; button, 2+layers, favorite thing (eCutting)
Fab n Funky  #242 something new (the quote stamp)
Penny's Challenges  #210 anything goes
The Paper Shelter  #186 punches or dies
Sisterhood of Crafters  #24 use a new craft toy (the quote stamp)
4 Crafty Chicks  #229 Flowers
Red Rubber Challenge  #203 birthday
Sassy Studio Designs #264 favorite color combo (pink/greens)

http://yogiemp.com/HP_cards/MiscChallenges/MiscChallenges2015/MCJan15_MixedMedia_HaveAHeart_HB.html

Monday, February 17, 2014

MC Feb/14 Dreamweaver Flutter - Song of Solomon

Thought I'd better get cracking with the Dreamweaver challenge which has a theme of anything that flutters... to me that has to be butterflies BIG GRIN

I first just cut out a rectangular stencil a bit smaller than the outline of the butterfly background piece (Dreamweaver LL518). Placed it on my cardstock and applied Versamark all over. Removed this stencil and lay down the butterfly stencil and sponged Pan Pastels all over using "Magenta" & "Turquoise" (note they stick to the Versamark.). Removed the stencil and sprinkled with clear embossing powder (it stuck to all the un-colored areas). Heat set.

Lay down the large butterfly stencil (Dreamweaver LJ887)and pushed my Versamark mini pad into all the crevices. Removed the stencil and applied the Queen's Gold embossing powder, heat set.

Stamped the quote (Quietfire Design) using Verafine "Majestic Blue" and clear embossed. Adhered this to my aqua colored side folded card front (4.25"w x 5.5"h).

Decided I wanted some glitter, so added a piece of Sookwang tape along the left edge and applied Distress "Star Dust" glitter. As a final touch added two aqua colored rhinestones.

Click on image to enlarge.

And it fits for these challenges:
Dreamweaver  monthly Feb  Flutter
Penny Black at All Sorts Challenge#79  Monthly Feb  Sparkle
Card Makin Mamas  #79  Sparkle
Love to Scrap Challenge  #24  anything goes
Southern Girls Challenge  #86 bling
Pan Pastels UK  #59 anything goes


Saturday, January 18, 2014

MC Jan/14 - Dreamweaver Fern - Sympathy cards

 I hate thinking about it, but I'm going to need a few sympathy card in the very near future... and since Dreamweaver's challenge this month is CAS cards, I figured I'd use the incentive and make a couple...

I used the Dreamweaver LJ846 stencil for these cards. Love ferns and this stencil BIG GRIN.

Both cards are 4.25"w x 5.5"h side folded white cardstock. Both use Quietfire Design calligraphy stamps ("10 Tiny Words set" or "With Deepest Sympathy")

For the first card, I masked off a 1" border all around. Lay my stencil down and applied Distress "Crushed Olive" all over then hit it with a bit of "Forest Moss". Applied the regular white paste which picked up the water based green pigment on the card, so I used that for the card below... Removed the stencil and dried it naturally.

Drew in the thin green line border using a Distress marker. Embossed the leaf border (Cuttlebug "Organic Flourish" set) using my hard rubber mallet to emboss only where I wanted...

Stamped the sentiment on white cardstock using Versafine "Olympian Green" and touching here and there with Black Onyx, then clear embossed. Die cut with Spellbinders "Fancy Tags" die set and sponged with my dirty green sponge. Adhered to card and added the pale green rhinestones.

For the second card, as I mentioned above, I used the dirty white paste (didn't want to waste it BIG GRIN) and just spread it over the stencil. I wasn't careful enough and a bit landed past my stencil - sigh!!, so I scrapped off as much as I could, but there was still a stain, so I creatively covered it up with the green border...

I did that by masking off the center white area leaving a 1 border all around which I sponged with Olive and then lightly with "Frayed Burlap".

Stamped my sentiment with the black. Drew in my outline border with the olive marker. Voila, all done.

Click on either card image to enlarge. Enjoy

And it fits for these challenges:
Dreamweaver  Monthly Jan  CAS
Brown Sugar Challenge  #77  anything goes
Sister Act Card Challenge  #40 anything goes
Sweet Stampin Challenge  Use your favorite style (side folded CAS)


Thursday, October 24, 2013

MC Oct/13 - Halloween - On The 1st Day

One last Halloween card... all the image stamps are from Inkadinkado and the quote/sentiment stamps are from Quietfire Design.

I side folded my whtie card (5"w x 7"h). Direct to paper with "Shaded Lilac" and "Tattered Rose".

Electronically cut the spider web from black cardstock. Dabbed my Embossing Dauber randomly, embossed with Stamp 'n Bond, heat activated and then sprinkled Stickles Glitter "Star Dust" and heated again. Adhered to card.

Stamped the spider on black cardstock and clear embossed, then hand cut it out and adhered to card.

Die cut the tombstone border (Tim's on edge) from white cardstock, direct to paper with Versafine "Smokey Grey" and embossed with sprinklings of Distress "Antique Linen" & "Milled Lavender", when cooled, rubbed the excess particles off, and adhered to card.

Stamped the ghost on to Ruche textured cardstock using the grey and hand cut out, adhered to card.

Stamped the pumpkin with Versafine "Habernero" & "Spanish Moss", clear embossed and hand cut out, then direct to paper with Distress pads. adhered to card.

Stamped the quote with Versafine "Black Onyx"

On the inside, stamped the spider sprig, the 2 sentiments with the black. Sponged through aDreamweaver spider web stencil with Distress Pumice Stone. Sponged around the edges of card with a dirty orange & purple sponge.

Click on images to enlarge. Enjoy

And it fits for these challenges:
Oozak Challenge  #24 Friendship
Card Mania  #32 Halloween
Crazy Challenge  #156 Halloween
Kaboodle Doodles  #194 Halloween Colors
Lexi's Creation  #101 Halloween
MIM Challenge  #117 Halloween
The Pink Elephant  #222 Trick or Treat
City Crafter  #182 Pumpkin
Flourishes  #243  fussy cut something
Scrap Creations   Halloween
Tuesday Throwdown  #170 Creepy Crawlies
Belli Challenge  #181 Halloween
Crafty Creations   #245 Halloween Characters
Divas By Design  #108 Spooked
Fab n Funky  #190 Distress
Simon Says Stamp Challenge  Halloween
Sisterhood of Crafters   Halloween
Desert Island Crafts  #64  use any 3:   Witches / Broomsticks, Black Cats, Cauldrons, Use Stripes, Sentiment on Front, Use Lots of Black, Glitter & Sparkle, At least 2 Ribbons, Use Kraft Cardstock / Paper, Die Cuts or Punches
Simply Create Too  #48 Halloween
2 Sisters Challenge  #166 Halloween colros
Corrosive Challenges by Janet  #185 dress me up (Halloween)
One Stitch at a Time  #186  anything goes
Pile it On Challenge  #42 Halloween
CCEE Stampers  1343
Cute Card Thursday  #292 Spooktacular
Cupcake Challenge  #233 see inspiration image below


Colour Q  #212 see color swatch below


Wednesday, October 9, 2013

DT Oct/13 - Cats - If The Broom Fits

http://quietfirecreations.blogspot.ca/2013/10/oct13-cats-if-broom-fits.html
My turn on the Quietfire Creations blog today and I'm using the technique Holly showed us a couple days ago "faux cross stitch" and using one of Suzanne's newest e-cut files from the Silhouette store and a Halloween stamp.

You can see all the details and descriptions etc by clicking on card image. Enjoy. or you can go to my website HERE.


Saturday, September 28, 2013

MC Sept/13 - Dreamweaver/GelliPrint - The Woods would be

As you know I've been playing with my Gelli Plate for the past week. One of the technique I used was brayering Golden's gel medium onto the Gelli plate, pressing down a stencil and pulling a print. That got me thinking about using a Dreamweaver stencil and their pastes... This is one of the results using the translucent paste & stencil LJ901. You can see more Dreamweaver/Gelli Prints & Pan Pastels HERE.

I side folded my white card (5"w x 7"h). Ran it through my machine with the Crafts Too "Feathers" embossing folder - my newest acquisition... I sponged some Distress using dirty sponges (yellow, red, green)

I layered a strip of textured cardstock in that teal color.

Trimmed down and layered my Dreamweaver piece and then a piece of teal satin ribbon (another new acquisition, got a whole 24pce set). Used Tim's Stampers Anonymous "Spring Fever" set for the faux stitching and stamped with Black Archival.

Stamped the quote (Quietfire Design) also with the Archival.

Electronically cut the feathers and used the dirty sponges to color them, then scored veins and feather lines and sponged some "Gathered Twigs". Added sparkle with a Viva  "Holo Iridescent" pen. Adhered to card and then adhered the 3 buttons (another acquisition - it was the stitches show here in Calgary this weekend).

Click on either image to enlarge. Enjoy

And it fits for these challenges:
Dreamweaver Challenge  Monthly Sept Autumn/Glitter
Card Mania  #30 use at least 1 button
Crafty Cardmakers  #100 winged things as focal
Inspiration Avenue  Fall colors (orange, yellow, brown)
Scrap Creations  Fall
Fab n Funky  #106 add a button
A Simple Five  #122 anything goes
Totally Paper Crafts  #186 stitching
Wags n Whiskers  #113 sparkle
2 Sisters Challenge  #163 anything goes


Saturday, September 21, 2013

Quietfire Design & Dreamweaver - Awesome in Autumn Blog Hop - Gilded cards


"It's been an amazing week of Awesome in Autumn!
This week we partnered with  the Dreamweaver Design Team and had so much fun playing with their innovative stencils, pastes and glitters!
It's not too late to go back and leave your comments on each blog,as well as today's, for an opportunity to win one of two wonderful prize packages!"
Prizes will be announced on Thursday, Sept 26th! 
You have till midnight this Sunday (Sept. 22) to leave your comments.


Here's what I've created for today's post:
I'm using a couple oldie but goody stamps from Quietfire Design for these first 2 gilded cards "Every Blade in the Field" & "Every End is a New\"
PS click on any image to enlarge. Enjoy.

ID: Dreamweaver/QF - Every Blade in the Field
size: 7"w x 5"h
Stamped my quote using Versafine Black Onyx on cream toned Bazzill Monochromatic cardstock and clear embossed. Made a mask from some tracing paper and then laid my stencil (Dreamweaver "Gingko Bough" LJ893), using removable tape on all sides, making sure my whole card was covered.... you don't want an accident and some paste landing where you don't want it. I used the Dreamweaver paste applicator (LM2010) and the matte black paste. Don't rush applying the paste and apply firm pressure so you do not have to go over the stencil more than once. This will help avoiding runs under the stencil.

Remove the tape and stencil (putting it into a bucket of water to clean later), drop on a piece of red variegated gold leaf and with a soft brush, feather touch the gold leaf so it touches the wet paste. Be careful only a feather's touch... or you might ruin your wet paste. When the whole design has been feathered, set it aside to dry thoroughly.

When dry, with a soft brush, brush away the excess gold leaf. I then used a piece of undyed silk material wrapped around my finger and just lightly burnished in a circular motion, until all the excess gold leaf was removed. I loved the look that some of the leaf did not adhere to the paste. If that's offensive to you, just put your stencil back in place and use a glue stick in the ungilded areas, remove stencil and apply the gold leaf, allowing some drying time before removing the excess.
   
I layered my gilded piece to black cardstock, then onto my side folded rust colored card. Since I was using an 11"w piece of cardstock and my card was 7"w, the fold over piece is only 4".


ID: Dreamweaver/QF - Every End
size: 5"w x 7"h
   
I used the same technique as the card above, this time using the "Maple Branch" #LJ906 and a variegated leaf called "Autumn" on a dark brown Bazzill cardstock. Edged the leafed layer with a gold Krylon leafing pen.

Layered on to a Parchment cardstock side folded card using 4 gold leaf shaped brads.

The quote was stamped with pigment ink and embossed with Queen's Gold. 


PS: you can also get Dreamweaver stencils & supplies in the Quietfire Design store HERE.

Check out this week's awesomeness which includes...
Tuesday, September 17th:

Quietfire Design Members...
and
Dream Team members...
and the
and

Wednesday, September 18th:
Quietfire Design Members...
and
Dream Team members...
and the
and

Thursday, September 19th:
Quietfire Design Members...
and
Dream Team members...
and the
and

Friday, September 20th:
Quietfire Design Members...
and
Dream Team members...
and the
and

Saturday, September 21st:
Quietfire Design Members...
and
Dream Team members...
and the
and


Friday, September 20, 2013

Quietfire Design & Dreamweaver - Awesome in Autumn Blog Hop - When Can I Come Visit

Get ready for an amazing week of Awesome in Autumn! This week we are partnering with the Dreamweaver Design Team and are so excited to play with their innovative stencils, pastes and glitters! Follow along with us and leave your comments on each blog for an opportunity to win one of two wonderful prize packages.

Here's what I've created for today's post:


I'm using one of the newest stamps from Quietfire Design "Home Congratulations" set for this card

All the stenciled elements use the basic white paste.

I stenciled the Tall Vase (LM 196) on a separate piece of white cardstock, and then tapped it with my palette knife to create little craters. Removed the stencil and dumped it in my water bucket to clean later. Spritzed the wet paste with Distress Stains put in to mini misters ("Peacock Feathers" "Mustard Seed", "Salty Ocean", "Picked Raspberry"). Set it aside to dry thoroughly.

I taped down my Cattails LL517 stencil and spread my paste, removed stencil and set it aside to dry completely. When dry, taped down my Tree Frog LM154 stencil and applied my white paste being very careful where it overlapped the cattail area so my paste wouldn't seep underneath. Set it aside to dry again. When dry, colored everything with Spectrum Noir Alcohol pens. Love the way they blend on the paste.
Hand cut out my vase and applied Glossy Accents all over, set aside to dry again.

Side folded my deep blue card. Sponged Distress Broken China around the edges of my pasted piece. Adhered to card front.

Edged my vase with a Krylon gold leafing pen, then adhered to card.

Stamped my quote with Versafine Black Onyx on white cardstock and clear embossed. Die cut with Spellbinders "Majestic Elements - Resplendent rectangles" using an off the edge cutting technique to get the size I wanted.
Edged it with the gold leaf pen and then onto the card with 3d Foam tape.


Technique: Only the portion you want to cut should be sandwiched between your plates. The rest of the die should be hanging free off the edge of your plates. Tape your die and cardstock so it doesn't move as your aligning it on your plates. PS you can do angle designs as well as rectangle and square designs. It's just how you position it off the edge of your plates.

The dragonfly was punched (EK Success Whale of a Punch "Dragonfly") on white cardstock. Pressed the wings onto a Distress Broken China pad and then embossed with Holographic embossing powder. Colored the body black with a marker.


PS: you can also get Dreamweaver stencils & supplies in the Quietfire Design store HERE.  

Check out this week's awesomeness which includes...
Tuesday, September 17th:

Quietfire Design Members...
and
Dream Team members...
and the
and

Wednesday, September 18th:
Quietfire Design Members...
and
Dream Team members...
and the
and

Thursday, September 19th:
Quietfire Design Members...
and
Dream Team members...
and the
and

Friday, September 20th:
Quietfire Design Members...
and
Dream Team members...
and the
and

Saturday, September 21st:
Quietfire Design Members...
and
Dream Team members...
and the
and


Sunday, September 15, 2013

MC Sept/13 - eCut - Halloween Boo


I was in a mood to make a Halloween card BIG GRIN and of course use my new electronic cutter...

I side folded my white 110# cardstock. Cut a nice sized circle (Spellbinders) and used it mask my moon. Hit the card front with  Distress "Stormy Sky" then "Chipped Sapphire", then "Dusty Concord". Removed the mask and gently swiped a spong over the white moon for ghostly streaks. Stamped a lot of the Halloween word/sentiments from the "Halloween Wicked" set from Quietfire Design  usingVersfine "Toffee" and embossing with "Amethyst" embossing powder.

I cut the house and made a silhouette image as well which I sponged with Distress "Mustard Seed"

The house was sponged with Pumice Stone, then some Crushed Olive, then I embossed it with
Spellbinders Brick/Wood Grain embossing folder using the brick side (actually the negative of the brick folder... so it looks more like siding than brick). Hit the high points with "Aged Mahogany". Glue them together.

Cut the bare tree and hit it with a Walnut Stain pad. Cut the fence which is a take on the Memory Box haunted fence die. Used the woodgrain embossing folder and sponged various browns. The ironwork was hit with a black pad and embossed with black embossing powder.

I electronically cut the cat (Quietfire Design), hit with black pad and black embossing powder and added an amber rhinestone for the eye.

Stamped the word "Boo" from the same Halloween rubber stamp set, clear embossed, die cut with Spellbinders "Radiant Rectangles" set, sponged some yellow, adhered it to the card, wrapping part of it to the back of the card.

Punched out the bat (Martha Stewart) from black cardstock. Added some white rhinestone stars.

Assembled everything together. I'm content.


And it fits for these challenges:
Pan Pastel UK  #37 make it blue
One Stitch at a Time  #181 Autumn/Fall


Monday, August 26, 2013

MC Aug/13 - Dreamweaver Grid - Thank you

I mentioned a few days ago I had some works in progress using a technique from an online friend... Well I finally finished one of them and am very pleased with it. Thanks Wanda for the inspiration.

I'm using a Dreamweaver grid stencil, translucent paste and Distress Stains... To see more details and descriptions, just click on card image and enjoy.

and I'm using one of the newest Thank You stamps from Quietfire design.

And it fits for these challenges:
Alphabet Challenge  N for newest stamp
All Sorts Challenge  #221 use acetate (layer over the Stencil edged in gold held down with brads)
2 Sisters Challenge  #158 make a square card

Saturday, August 24, 2013

MC Aug/13 - Paste & Spray Easel - You're Amazing

An online friend created a tag for Quietfire Creations using a Dreamweaver Stencil, Translucent paste, and Distress Stains as sprays. It looked fabulous and right up my alley. Had to try it. But as it turns out, they are still works in progress BIG GRIN. This card uses the same technique but instead I used Dreamweaver regular paste (the white one) Love the results.


So to see more details and descriptions, more views etc, just click on card image and enjoy. 

I'm using a couple stamps from Quietfire Design, one from the Nature Quote set and a more recent sentiment one.

And it fits for these challenges:
Paper Playtime #17 use pearls
Squigglefly  #3313 ribbon/twine/floss
Creative Craft Challenge  #17 not a square
Digi Stamps 4 Joy  #74 anything goes
Divas By Design  #99 use twine (ties the large bow and has coiled endings)
Lil Red Wagon  #199 3 or more layers
Penny's Challenges  #141 dies/punches (used both)
A Simple Five  #117 anything goes
Old Back Porch  #86 card a week
Totally Papercrafts  #181 tag & hearts