Showing posts with label origami. Show all posts

Wednesday, May 6, 2026

Purple Geli Print - Origami Env - Bow Closure


size: 5"w x 3.5"h

I saw this cute bow origami env and had to make 1 (actually had to make 2 others before I got to this one...) 

Hopefully this gets you to where I saw it on Instagram (Raushan Willms Apr 16/26 https://www.instagram.com/reels/DXHjahnthlm/) 

I used my purple toned geli printed paper 20cm sq

I love the bow it makes. 

Thursday, March 26, 2026

Origami Book - Artwork Jan - Mar, 2026


Another Origami book, this time holding artwork done in Jan, Feb & Mar this year. 

Created with Bogus Recycled Rough Sketch paper 70# 18" x 24" pad. Used 1 sheet per booklet page and 1 sheet for the links

I stopped at 6pages including the covers,, otherwise it would have become too unwieldy...

I like the results. 


Sunday, March 8, 2026

Origami Booklets - Geli Prints


size: 4.5"w x 5.5"h x 1.5" thk.
size: 4.75"w x 4.25"h x .75" thk

I made a pile of geli prints at my last gals get together and created Origami Booklets from them... Nothing inside them yet.
The green one has 18pages including the covers. It's the largest I've done one so far. I reinforced the spine using 110lb cardstock and then glued a geli print onto it.
The orangey one has 10 pages including covers.
Both sizes are made from 8.5 x 11 paper depending on the orientation of your folds you can get either size.

Thursday, February 26, 2026

Origami Booklet - Beyond The Horizon


size closed: 3.75"w x 3"
I was creating this little booklet at my Guild's play day this past Saturday. I love making these little guys... I'm using one of my recent geli prints I made. Added the text in a style with a ZIG Writer.
words:  Just beyond the horizon of the so-called impossible is infinite possibility. Bryant McGill

Wednesday, February 25, 2026

Origami Booklet - Green Geli Print - With Buckle


size closed: 5" sq
I was in a mood to create a square booklet so pulled out my recently made geli papers. I love making these little booklets... I'm using one of my recent geli prints I made.
Was rummaging for something and came across this molded buckle type thing - I again made eons ago... so thought I'd use it on this belt.
No text in this one yet...

Friday, February 13, 2026

Origmi Booklet - Thoughtful Words


I did a Google search of "Origami" on my website and came up with a bunch of stuff and this structure was one of them which I did in 2015... I said perfect since I only had 4 words for a booklet.

I used scrapbook cream and deep brown cardstock for the pages, covers and inserts

INSTRUCTIONS:
No glue or adhesive of any kind and no cutting other than to make sure all your pages are the same size and your links/spine are the right size

My booklet starts out as an 9-7/8" x 6.25" piece of paper and ends up being approx 4.75" x 3.125"


BOOKLET CONSISTS OF:
Covers - 2 sheets
Spine - 1 sheet
Pages - a sheet for each page (my booklet has 3 pages)
Links - same quantity of sheets as number of pages + 1 sheet for the spine. 

All sheets should be the exact same size. Each page in the booklet will turn out to be 1/4 the size of your sheet. So an 8.5 x 11" sheet will give you a page size of 4.25”h x 5.5"w links/spine size of 4.25 h x 11” w - or page size of 5.5”h x 4.25”w and links/spine of 5.5”h x 8.5”w
Note: Use decorative papers for the covers, spine, pages and external links. Inner links can be any paper since they are basically hidden.

Fold (top to bottom) in thirds (doesn’t matter if the thirds are equal as long as the edges meet) - this will be the height of your booklet. Fold pages (left to right) of paper so edges meet each other (this will be the width of your booklet).


Cut your spine pieces and fold in half and slip into folded page slots - one side into the right folded page and the other side into the left folded page.
When all pages are slipped in, use your spine piece to slip into both cover pieces.


Wednesday, October 25, 2023

Accordion Box - Multi Color


One of our Art Of The Fold members gave us a link to this structure for our next meeting. It's cute...

Instructions HERE

Made from various colored copy paper. Opens to about 5.5"w x 4"deep x 2.5"h. Each is made from an 8" x 8" piece of paper.

Wednesday, February 1, 2023

Thread Box Card - To Be Satisfied


I haven't made an Oriental Thread Box in eons... and all of a sudden I had this urge...

Click on image for more details and images etc. Enjoy

Thursday, December 22, 2022

Flower Folding


I came across this flower structure by Katharina Ostenda on kalligrafenkring fryslan facebook. She had really good clear images so I was able to replicate what she did. Thanks you.

Click on image for more details, images and instructions. Enjoy

Friday, November 26, 2021

Scribbled Lives 2021 - Nov - Wk 47 - Purse


Scribbled Lives 2021 - Nov - Wk 47 - Purse. So I searched for origami purses... and came across this one that had very clear INSTRUCTIONS. Fun to make.

Click on link for more details etc. Enjoy

Tuesday, May 25, 2021

Art Of The Fold - More #13 Wheel Of Fortune


Art Of The Fold - More #13 Wheel Of Fortune. After making my watermelon Wheel of Fortune, it's been sitting on my shelf in front of me, and I kept saying I should try a few versions of it...

#2 I really wanted to try one with calligraphy, but I'm not that pleased with the results. I think I should have made a larger version of it.


#3 Then I thought I'd try using my oriental paper. I really like that one.For that one I didn't fold the bottom points up.


#4 Then I made one like the directions - finally - except for the size of paper I used... I have a hard time doing something exactly as instructed...


#5 And my final piece is a larger version of #3. I LOVE this one. The size of paper I used was 5.5"h x 34"w. It's a misc calligraphy paper which I spliced together to get the width. I used Versafine Clair stamp pads to color both sides of the paper. Much better than using watercolors which would warp the paper. I love the way it stands so tall and proud...


Anyway click on any image for lots more details and images etc. Enjoy


Friday, March 5, 2021

Crab Claw Box

A friend introduced me to the Crab Claw Structure to hold a booklet. I was intrigued again. That's such a nice feeling... She saw the design and instructions on Roberta Lavadour's website. I must admit the instructions were a little confusing, but after trying a couple times I finally understood what I was doing wrong. BIG GRIN Maybe it will be clearer for you...

So for future reference I wrote up a diagram for the instructions. I used Clairfontaine Kraft Brown/Black 90gr paper.

Click on any image for more details, info and pics. Enjoy 


Tuesday, February 27, 2018

Origami Fold Paper Holder


http://yogiemp.com/Journals/OrigamiFoldedPaperHolder.html
At our Guild's meeting on Saturday, one of the members (Christine Ahmad) taught us this origami style paper holder. Love it. This size is great for holding handouts from classes. One made from 8.5" x 11" paper makes a great gift card holder... There are a whole bunch of various pockets to slip things in. I have a pictorial step by step tutorial on how to make one for yourself - or a bunch...

No glue or adhesive of any kind and no cutting...

http://yogiemp.com/Journals/OrigamiFoldedPaperHolder.html
inside of holder
Since our next Guild Journal deals with flora & fauna, I made mine with that in mind. The flowers on the top of the front page and on the inside are floral designs I picked up from Helen at https://alittlelime.blogspot.ca/   Love her artwork

Click on any image to see all the details and descriptions etc. Enjoy
And it fits for these challenges:
MMM Challenges  #65 messy backgrounds

ANYTHING GOES:
Crafty Sentiments Challenge
TTCRD  #27 - 5 
Penny's Challenges  #368
Scrapyland Challenge  #84
Little Miss Muffet  #183
Southern Girls Challenge  #178 nature

http://yogiemp.com/Journals/OrigamiFoldedPaperHolder.html
back of holder

Tuesday, October 27, 2015

Origami Chinese Thread Book - Quill - Create Without Limits

 http://yogiemp.com/Journals/OrigamiChineseThreadBook_Quill_CreateWithoutLimits.htmlNancy Dormer from my Guild will be teaching this structure in 2016. When I saw the pic, I thought to myself, I've made those boxes before... and yes around 2005 or 2006, the By Hand Artists Yahoo group had a journal page Round Robin and I had made one of those boxes to hold a bunch of my photographs to the journal page. You can see one of those pages HERE  Boy does that bring back memories... I never realized what the booklet structure was called - Zhen Xian Bao (translates to Needle Thread Pockets). So I proceeded to make one this weekend and I used a bunch of my calligraphy practice sheets BIG GRIN. What a great way to use up some of the foot high pile I have... The cover is made from Color Burst/salt decorated watercolor paper I made at the Paper Pastimes Pop Up recently. And inside the cover paper is one of my old Gelli Prints. All the flowers are from eons ago including some heat shrunk Perlé bead flowers... Sheesh I was good. ROFL.
http://yogiemp.com/Journals/OrigamiChineseThreadBook_Quill_CreateWithoutLimits.html

Anyway you can see all the details and descriptions by clicking on any image. There are a bunch more views on my website. Enjoy

I'm using a sentiment stamp from Quietfire Design. I love this sentiment... "Create Without Limits"

And it fits for these challenges:
Craft Your Passion  #285 anything goes
Simon Says Challenge  gift wrap or wrap it up  (2nd entry)
Brown Sugar Challenge  #168 green & purple (booklet front: purple heat shrunk bead flower)
TTCRD  #27 - 2  anything goes

http://yogiemp.com/Journals/OrigamiChineseThreadBook_Quill_CreateWithoutLimits.html

Thursday, June 18, 2015

MC June/15 - Origami BFlies - Dwell in Possibility & Origami Butterfly Tutorial

http://yogiemp.com/HP_cards/MiscChallenges/MiscChallenges2015/MCJune15_OrigamiBFlies_DwellInPossitility.html
Just got a bunch of the newest stamps from Quietfire Design. And again they are gorgeous... Had to play with one of them "I Dwell in Possibility" by Emily Dickinson. Love that saying.

I was also playing with making some origami butterflies. Fun - so had to put them on the card. I've included a tutorial with the card just in case you have a hankering to make some too. BIG GRIN.

Click on card image to see all the details and descriptions and to go to the tutorial. Enjoy

And it fits for these challenges:
ANYTHING GOES:
Penny's Challenges  #232
Little Miss Muffet  #114
Sassy Studio Design  #286

Wednesday, June 17, 2015

Origami Bows

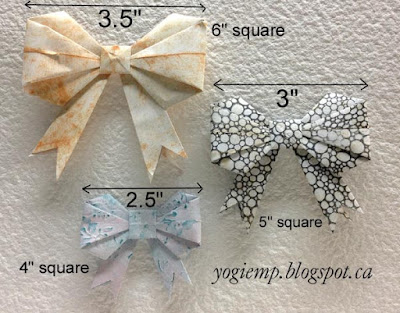
http://yogiemp.com/Crafts/OrigamiBowTutorial.html  Love making these origami bows. They are so easy to make too... You can see my tutorial HERE

The 3.5" wide bow is made with a 6" square piece of paper. The smallest bow 2.5" wide made from a 4" square.

Saturday, January 10, 2015

Origami Booklet

http://yogiemp.com/Journals/OrigamiBooklet.html

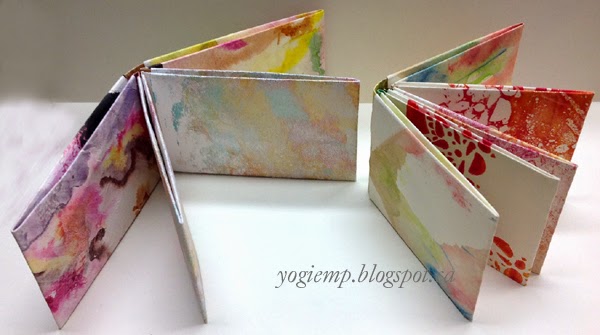
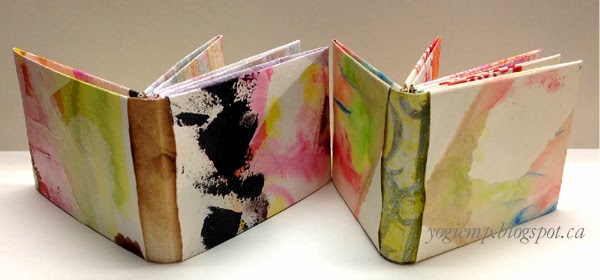
At our Guild meeting today, one of the members (Nancy Dormer) taught us an origami booklet structure... love it. I can use up a whole bunch of my Gelli prints... She learnt the structure from this book: Trash Origami: 25 Paper Folding Projects Reusing Everyday Materials by Michael G. LaFosse. The structure was originally designed by Rona Gurkewitz, USA.

Click on either image to see all the details and descriptions as well as instructions on how to create your own booklets. 

Enjoy

http://yogiemp.com/Journals/OrigamiBooklet.html

Sunday, November 25, 2012

Origami Xmas Ornaments

Click on image to see large view
Came across some instructions to make these origami Xmas ornaments and thought I'd give them a try. Worked... I did them just with scraps of scrapbook papers. No glue. The only finicky part was putting the two halves together. You have to hold the pleated part so it doesn't come apart as you're inserting the next folded part. I also decided to string embroidery thread on one of them and wire on the other, going all the way through the ornament. This acted to also hold the two halves from accidentally coming apart, although they were pretty snug with doing that.

You can see the blog post that I found HERE

Thursday, October 6, 2011

Origami Leaf Cards

 
Oh boy I love this card design... I recently came across this Origami Leaf design on the Paper Zone website, tried it and have fallen in love with it.

It has so much potential. I will be making some ATCs using the design as well.

I also got inspired by a card I recently saw on Leslie Miller's blog of the Flourishes maple leaf so beautifully painted, I had to do some too. BIG GRIN

I'm also using Quietfire Design quote and sentiment stamps on the cards.

To see more details and descriptions etc. just click on either card. I also have the details on how to fold them. Enjoy.

And it fits for these challenges:
Flourishes  #138 fall inspiration image (see below)
Scrap Creations 1  Fall
Stamp with Sarah Kay  #152 Autumn
Challenges by AR  AR92911 Fall/Halloween
Dutch Dare card Challenge  #133 Special fold
Moving Along with the Times  #119 Autumn Leaves
Paper Play challenges  Wk 40 Autumn colors
Card Makin Mamas  #30 Fancy Folds
Cutie Stampers  #112 Fall/Autumn
Die kreativen Stemplefreunde  Fall/autumn
Color Throwdown  #162 color combo (See below)