Showing posts with label Tutorials. Show all posts

Friday, September 1, 2023

Bister - Be Bold Step By Step (Aug 30/23)


While playing with the gals I was playing with my Bister powders which I keep some of them in a Stamper's Anonymous Glitter Duster container. It dispenses a nice fine spray of powder where I want it...

I thought I'd take pics of each stage of creating this project.

Click on image for more details etc. Enjoy

Saturday, February 19, 2022

Helen Hiebert Folded Hat


Helen Hiebert launched her newest book and shared this Folded Hat project. Fun.

Click on image for more details etc. Enjoy

Wednesday, October 13, 2021

Brusho, Color Burst & Bister Powders video


Brusho, Color Burst & Bister Powders video. I've had several people ask me how I create my colorful letters, so thought I'd do a short video. Enjoy

Monday, September 20, 2021

Art Of The Fold - One Sheet - Franklin Fold - My Way


Art Of The Fold - One Sheet - Franklin Fold - My Way or the Highway. Our next ZOOM get together is Oct 12th with # 18 one sheet structures "Franklin Fold". A fun structure.

Click on image for more details, diagrams etc. Enjoy 


Friday, July 9, 2021

Scribbled Lives 2021 - Wk 27 - Flowers - A Fallen Blossom


Scribbled Lives 2021 -Wk 27 - Flowers - A Fallen Blossom.

I've always been fascinated by Blackletter and circle formats... (Don't look at my flourishes...) Tamer Ghoneim does fabulous calligraphy and he had a ZOOM free class yesterday (July 8/21) where he showed his process for creating circular artwork. Picked up quite a few tricks.

Circle size, I'm still doing my way. I write out the quote, using the pen size and lettering style I will use on the final piece (doesn't have to be extremely neat...). Measure it and do a radius calculation.  (C=2πR). If the length (circumference) of my work is 15", (π= 3.14) so 2π = 6.28. Divide 6.28 into your circumference of 15" and you get  basically a radius of 2.4". Now you can draw your various circles. Put a pencil mark where you want the center of your circle and draw your first circle which is your base line. Then draw all the other circles. 

I used an EK Success Orbit Circle Scissor (sorry it's discontinued, but there are many other brands and style out there. I find the ruler type where you hold the center point is not very good for me - it always moves...

I used Bee Super Deluxe paper, drew my circles and did my lettering with a 2.4 Parallel pen filled with Sumi ink, double dipped into Ecoline Gold. Detail in between the letters with Holbien Opera Pink gouache and a fine tipped nib (Gillot). Drew the extra circles with a Gold gel pen and a pink Zig Writer.

Painted the flower with QoR watercolors accenting with the gold ink. The butterfly (Flourishes) stamped with Versa Clair ink and hand cut.

Quote: A fallen blossom returning to the bough, I thought - but no a butterfly. Arakida Moretake


Friday, March 19, 2021

Art Of THe Fold #23 - Diagonal Fold - Altered

Art Of The Fold #23 - Diagonal Fold - Altered. one of our members suggested making this structure, so I kept it in the back of my mind and finally created one. It was a cute structure and I was thinking it would be great to have a few of them put together to hold a bunch of stuff... Voila

There is a diagram with instructions on creating the altered aspect of this project.

Click on any image for more images and details etc. Enjoy


Sunday, March 14, 2021

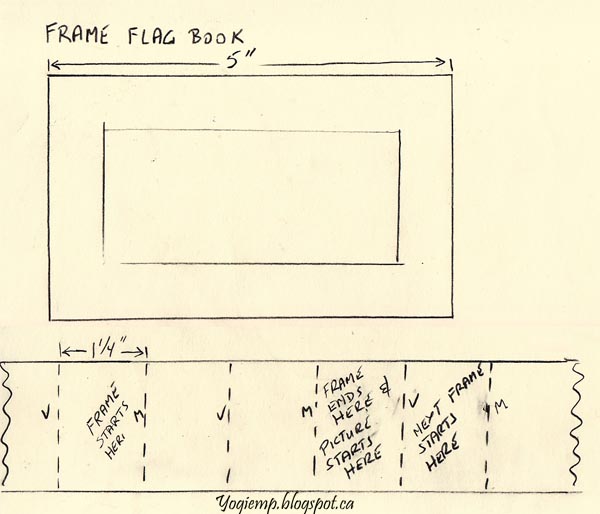
Flag Booklet - Accordion Instr


When I created my 1st couple of flag booklets I was very upset that I couldn't see everything at a glance without having to hold the previous pages out of the way. So I mulled it over. The result is so simple it's crazy...

 To view the video click FlagBooklet_AccordionIstr

Click on any image for more details and instructions etc. Enjoy


Thursday, October 8, 2020

Diamond Easel Cards Merry Christmas and Noel


One of the gals from our Crafty Dozen was demoing a diamond easel card... not sure if that's the official name for this card but the best one I could come up with. It's fun to make. Not sure what the  actual dimensions were from her card, but these are the ones that worked for me. to see more details for the instructions, click on any image. Enjoy

The larger card is not created as a square so it takes a bunch of calculations to get the pieces the right size... The smaller card is easy. BIG GRIN


Monday, September 30, 2019

Sept/19 - Side Fold Poinsettia - ECD Dec 25 - What Is Christmas

 http://www.yogiemp.com/HP_cards/MiscChallenges/MiscChallenges2019/Sept19_SideFoldPoinsetti_ECDDec25_WhatIsChristmas.html
I came across a gorgeously colored green poinsettia and had to imitate it done by Laura Jane using The Ton "Poinsettia Close Up" background stamp released in 2017. You can see her post HERE. Since I didn't have the stamp I hand drew a similar image. Love the linear way of coloring...

I'm using a die "Dec 25" from Elizabeth Craft Designs, also available on Quietfire Design HERE 


You can see the technique for creating a shadow layer HERE 
 

I'm also using a rubber Xmas quote and design element stamp from Quietfire Design ("What Is Christmas..." 2pce set);  ("Poinsettia Banner and Sentiments" 4pce set)

Click on any card image to see all the details and descriptions etc. Enjoy
 http://www.yogiemp.com/HP_cards/MiscChallenges/MiscChallenges2019/Sept19_SideFoldPoinsetti_ECDDec25_WhatIsChristmas.html

Friday, September 20, 2019

Shadow Layer for a die cut

There have been some misconceptions on how I create my shadow layer for "An A Way With Words" die cuts. So I thought I'd try to clarify how I do them.

You'll notice I have 3 die images. A: is the easiest to create a shadow layer. B: is a bit more tedious but at least has some open inner areas and C: takes more finesse... BUT all are doable.

The instructions use the die cut contour right side up which means at the end you'll need to erase your pencil lines. Sometimes I forget which way I do them but usually I work on the wrong side of the die cut contour so I don't have to erase my pencil lines. BIG GRIN

I tape down my die so it doesn't move, then slide my X-acto blade along the metal edge. Really easy if you have a very sharp blade. When I get to where there is tape, I'll hold my die and move the tape to a new location and continue cutting.

I'll use all the tools in my arsenal - like hole punches to get to some of the really small areas.

I hope this clarifies what I do. I hope to make a video of this technique in the near future.


Saturday, April 27, 2019

Retro Deco Workshop with Gemma Black


I took a 2 day workshop with Gemma Black from Australia - Retro Deco (Rennie Mackintosh monoline style lettering) (April 24 & 25, 2019). Loved it. Love when a teacher gives you a ton of ideas and techniques and also gives you the time to use them during class, so you don't forget what you've learned...


Click on any image to see all the details and descriptions etc and lots more samples. Enjoy

http://www.yogiemp.com/Calligraphy/GemmaBlack/GemmaBlack_RetroDeco.html

Wednesday, October 3, 2018

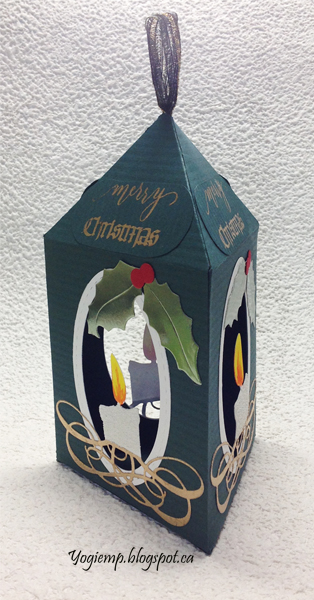
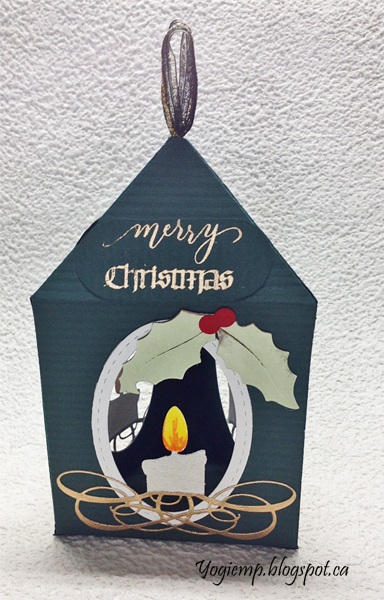
MC Oct/18 - 3 Sided Lantern - ECD Candle - Merry Christmas


quietfirecreations.blogspot.caIt's my turn on the Quietfire Creations Blog today. Suzanne came out with a bunch of new A Way With Word dies and I choose the flourished candle to play with first BIG GRIN.


To celebrate the new release, we're having a week long celebration and a giveaway!

To be eligible to win, leave a comment on each blog post on the Quietfire Creations Blog from September 28th through to Friday, October 5th, 2018.  We'll randomly choose three winners and send out one of the new dies to each winner! Good Luck everyone.
 

I'm using an A Way With Words dies  "Flourished Candle" 5pce set from Elizabeth Craft Designs, also available on Quietfire Design HERE

And I'm using a clear sentiment stamp from Quietfire Design ("Christmas Collection" 11pce set) also available from Elizabeth Craft Designs HERE 


Click on an lantern image to see all the details and descriptions etc, or click here to go to my website. Enjoy

And it fits for these challenges:
TTCRD  #2 - 7  anything goes
Dies R Us Challenge  #106  anything goes
Hiding In My Craft Room  #372  anything goes

quietfirecreations.blogspot.ca

Friday, September 28, 2018

Quietfire Design A Way With Words Sneak Peek

To celebrate the new release, we're having a week long celebration and a giveaway!

To be eligible to win, leave a comment on each blog post on the Quietfire Creations Blog from September 28th through to Friday, October 5th, 2018.  We'll randomly choose three winners and send out one of the new dies to each winner!


Good Luck everyone.

Friday, July 13, 2018

MC July/16 - One Sheet Card Fold - ECD Brrr, Merry Christmas - Good Friends, Peace

http://yogiemp.com/HP_cards/MiscChallenges/MiscChallenges2016/MCJuly16_OneSheetCard_ECDBrrr,MerryChristmas_GoodFriends,Peace.html
Boy this one's from a while ago which was languishing in my drafts folder. Sigh...

I taught this one sheet fold booklet structure at a Paper Pastimes Pop Up. Loving this one with the snowflake inserts. Love that Brrrr word. And it's another Xmas card under my belt BIG GRIN....
Click on any card image to see all the details and descriptions including a PDF of the fold instructions. Enjoy

I'm using an A Way With Words dies from Elizabeth Craft Designs "Brrrr!" and "Merry Christmas" also available on Quietfire Design HERE  and HERE
http://yogiemp.com/HP_cards/MiscChallenges/MiscChallenges2016/MCJuly16_OneSheetCard_ECDBrrr,MerryChristmas_GoodFriends,Peace.html

I'm also using quote, sentiment and design element stamps from Quietfire Design ("Good Friends Are Like Snowflakes..."); ("Flourished Ornaments" 4pce set; ("Let it snow, snowman" 5pce set); ("Illuminations 2 - Christmas" 4pce set) 

And it fits for these challenges:
Crazy Hazelnut Challenge  #392 anything Xmas opt snowflake (2nd entry)
Stamps Fun Creativity  #328 Bingo:  pearls, lt blue, Bfly; lt pink, bows, yellow; lace, glitter, flowers
TTCRD  #10 - 16 anything goes
The Paper Shelter  #347 Holiday Times
Scrapyland  #93 anything goes
Cute Card Thursday  #538 ribbons and bows
Southern Girls Challenge  #187 Bingo:  bling, lace, white; die, stamp, blue; ink, sequin, yellow


Saturday, May 5, 2018

MC May/18 - Impossible Card - ECD Sending Hugs - Life Doesn't Have To Be

http://yogiemp.com/HP_cards/MiscChallenges/MiscChallenges2018/MCMay18_ImpossibleCard_ECDSendingHugs_LifeDoesn'tHaveToBe.html

I recently came across this card structure called "The Impossible Card" and was intrigued...

You can see the HOW TO instructions for the structure HERE

I'm using an A Way With Words dies  "Sending Hugs Kisses"  3pce set  from Elizabeth Craft Designs, also available on Quietfire Design

And I'm using one of the newest stamps from Quietfire Design ("Life Doesn't Have to Be Perfect...")

Click on any card image to see all the details and descriptions etc. Enjoy

And it fits for these challenges:
Creatalicious Challenge  #138 anything goes opt sentiment
Aud Sentiments Challenge  #202 for a guy + sentiment

ANYTHING GOES:
Artistic Inspirations Challenge  #199
Crafty Sentiments Challenge 
TTCRD  #1-7
Penny's Challenges  #378
Cute Card Thursday  #528

http://yogiemp.com/HP_cards/MiscChallenges/MiscChallenges2018/MCMay18_ImpossibleCard_ECDSendingHugs_LifeDoesn'tHaveToBe.html

Tuesday, February 27, 2018

Origami Fold Paper Holder


http://yogiemp.com/Journals/OrigamiFoldedPaperHolder.html
At our Guild's meeting on Saturday, one of the members (Christine Ahmad) taught us this origami style paper holder. Love it. This size is great for holding handouts from classes. One made from 8.5" x 11" paper makes a great gift card holder... There are a whole bunch of various pockets to slip things in. I have a pictorial step by step tutorial on how to make one for yourself - or a bunch...

No glue or adhesive of any kind and no cutting...

http://yogiemp.com/Journals/OrigamiFoldedPaperHolder.html
inside of holder
Since our next Guild Journal deals with flora & fauna, I made mine with that in mind. The flowers on the top of the front page and on the inside are floral designs I picked up from Helen at https://alittlelime.blogspot.ca/   Love her artwork

Click on any image to see all the details and descriptions etc. Enjoy

And it fits for these challenges:
MMM Challenges  #65 messy backgrounds

ANYTHING GOES:
Crafty Sentiments Challenge
TTCRD  #27 - 5 
Penny's Challenges  #368
Scrapyland Challenge  #84
Little Miss Muffet  #183
Southern Girls Challenge  #178 nature

http://yogiemp.com/Journals/OrigamiFoldedPaperHolder.html
back of holder

Thursday, July 27, 2017

MC July/17 - Easel Double Embossed Stars - ECDWith Sympthy - Perhaps They Are Not Stars


http://yogiemp.com/HP_cards/MiscChallenges/MiscChallenges2017/MCMay17_EaselDoubleEmbossedStars_ECDWithSympathy_PerhapsTheyAreNotStars.html
I was in a mood to try a double embossing through a stencil... It's hard to see, but in real life you can also feel the height of the stars.

I'm using an A Way With Words die "With Sympathy" 2pce die and stencil "Butterfly and Stars Spray" from Elizabeth Craft Designs, also available on Quietfire Design HERE. and HERE

And using a quote stamp from Quietfire Design, ("Perhaps They Are Not Stars..."); 


Click on any card image to see all the details, descriptions and a step by step tutorial etc. Enjoy

And it fits for these challenges:
All Sorts Challenge  #425 fancy folds
Polka Doodle Challenge  #29 anything goes
Art Impressions Stamps  #213 text
Scrappyland  #70 anything goes
Crafty Creations  #346 anything goes
MMM Challenge  #51 monochromatic
City Crafter  #372 something beginning with "S" (Sympathy, stars spray, sky)


http://yogiemp.com/HP_cards/MiscChallenges/MiscChallenges2017/MCMay17_EaselDoubleEmbossedStars_ECDWithSympathy_PerhapsTheyAreNotStars.html

Monday, March 20, 2017

Gems - Tutorial


http://yogiemp.com/NittyGritty/images/GemsTutorial.pdf
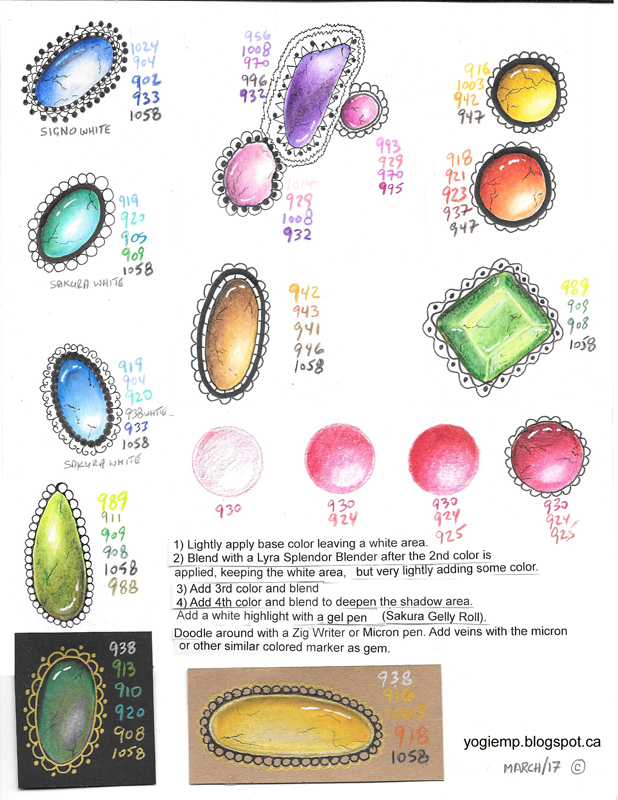
I'll be showing the gals at our next get together how I draw and color my gems. I love drawing them and adding the doodling around them. Relaxing and fun...

Click on the image to download a full size printable PDF file of the tutorial or click HERE for the file. Enjoy

The gems done on white paper are from a good quality sketch paper pad with no name... the black is Recollections brand cardstock.  The brownish paper is Bee paper Bogus Recycled Sketch paper.

All gems were colored with Prisma colored pencils which I find are the best and have lots of wax within them for god blending/merging of color. An optional pencil is Derwent Artist (not Derwent Studio). Most other pencils don't have enough wax in them and you will probably struggle trying to achieve the results you want.

On the black and brownish paper, I first put a light layer of white pencils.

Doodling done with a micron .01 pen or a Zig Writer. The white is a Sakura Gelly Roll Med gel pen.


Tuesday, October 18, 2016

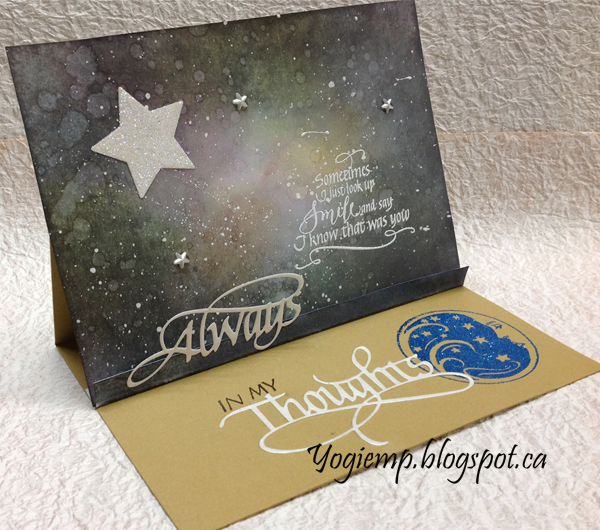
MC Oct/16 - Easel Celestial Sky - ECD Always Thoughts - Sometimes I Just Look Up

quietfirecreations.blogspot.ca
My turn on the Quietfire Creations blog today with a step by step tutorial on the celestial sky.

I'm using a couple of the A Way With Words dies from Elizabeth Craft Designs "Always" and "Warm Thoughts" also available on Quietfire Design HERE and HERE

I'm also using a quote and part of a quote from Quietfire Design ("Sometimes I Just Look Up..."); ("I Shut My Eyes...")

You can see all the details and descriptions by clicking on any card image or clicking HERE to go to my website. Enjoy

And it fits for these challenges:
Fab n Funky  #322  shades of grey or sparkle
Dream Valley Challenges  #142 for a guy
Polka Doodle Challenge  #41 anything goes
Sweet Stampin Challenge  spots or stripes

quietfirecreations.blogspot.ca

Wednesday, August 31, 2016

MC Aug 1/16 - Round Easel Macarons - ECD Party & - Celebrate HB

quietfirecreations.blogspot.ca
My turn on the Quietfire Creations blog today and I thought I'd make a tutorial on how I make my Macarons. BIG GRIN. I love Macarons and if it wasn't for the excess refined sugar in them I'd probably eat them every day... So I try to stay away from temptation...  PS the tutorial uses fat oval shapes, but I tried it with a round punch and that works just as well, giving a different perspective. BIG GRIN.

Click on any card image to see all the details and descriptions as well as the tutorial, or click HERE to go to my website. Enjoy


I'm using several A Way With Word dies from Elizabeth Craft Designs, "It's A Party"; "Let It Snow"; "Calligraphic Elements 2 - Ampersand" all 3 also available on Quietfire Design HERE, HERE and HERE

I'm also using several sentiment stamps from Quietfire Design "Just For You" 4pce set; "Twirl and Enjoy" 3pce set; "Happy Birthday Plain and Simple" 7pce set

And it fits for these challenges:
City Crafter  #327 Birthday
Crafty Sentiments Challenge  lots of layers
TTCRD  #30 - 5  anything goes
Pinspirational Challenge  #173 see image below

quietfirecreations.blogspot.ca