Showing posts with label 3D items. Show all posts

Saturday, January 31, 2026

SK - Valentine 2026


4.5"w x 3.75"h
Red basic cardstock base. Hearts punched out from red, gold textured and cream peralized metallic cardstock.
Mechanism white cardstock folded in half then then the center folded with an X. Red with white squares adhered to the X folds. More hearts punched out.

Monday, December 15, 2025

Art Of The Fold - Pop Up Card - From Me To You


The challenge for our next Art Of The Fold Group (Dec 2025) had us making this kind of structure. A bit challenging... I would make my tabs a little shorter.
 

size closed: 6"w x 7.5"h
The card base was made from a slightly textured 12 x 12 paper and the rest made with various brands of cardstock, the butterflies from gelli prints made on Columbia Mills LBS End paper.

Lettering on the front was done with DecoColor Premium gold pen and then shadow outlined with a ZIG Writer.

Ovals and butterflies punched out. and the inside lettering hand cut from another geli print paper..

Wednesday, November 13, 2024

Booklet In A Box - Floral Alphabet - Booklet All

Booklet box created with heavy weight misc white cardstock and covered with my geli print paper. Red cardstock closure with title and one of my wax seals.

3.5"w x 5"h x 3/4" thk.
Opens to approx 7.6'


On Canson Mixed Media paper drew out the letters and florals with a Juice Up pen that start with that letter. Coloring with various w/c media (Peerless w/c, ), accenting with gel pens.


Wednesday, September 4, 2024

Leafy Half Circle - The Future Belongs


I had done the leafy artwork a while back but made an error in the text I wrote out... So traced it and created a 2nd piece which you can see HERE, but I didn't have the heart to throw the first one away... I cut out the design to use on this piece...
Size: 8"w x 7"h
On Recollections Black cardstock adhered the cut leafy half circle to my cardstock along the central spine only leaving the leaves to have a 3D effect. They were standing off the cardstock already so just left it be. The quote written with a Nikko G nib and Gansai Tambi Yellow gold paint.
words:
The future belongs to those who believe in the beauty of their dreams. Eleanor Roosevelt

Monday, December 25, 2023

Flexagons - Keep Folding & Glob Hops


The challenge for our next Art Of The Fold Group had a couple options for our next meeting in January. Flexagons... you have to be careful how you turn/open the pages...
size: 3" sq
I used some of my geli prints for both done on Columbia Mills End Paper. the letters die cut using Tim Holtz "Vintage Market" and "Inside Out" on various colors of cardstock.

The multi colored one says Glob Hops Foxy Jack. I did this one first and didn't really know what to put on it... Hence the crazy 4 letter words...

The green one says "Live to fold and fold again. Keep folding.


Saturday, December 2, 2023

Art Of The Fold - Tunnel Book - Merry Christmas


Our December project was to make a tunnel book. Haven't made one of those in several years... and since we're in December... thought I'd make it an Xmas themed one. 


I used a heavy weight white cardstock (unknown brand probably 140#) for the pages. Dry embossed the cover and hit the high points with a red Distress pad.(I forget it expands the paper a bit so my first page warped a little - sigh!!)

The back page was stamped with a winter house scene and the area around the stamping colored with Distress Oxide pad Broken China.

I pulled out a pile of wintry and tree dies and cut from Staples white 110# cardstock. Colored with Distress pads. Added some glitter to the snowflakes and glossy accents to the red berries.

Well if nothing else I've finally used some of my embossing folder/stamp and dies which I haven't used in many years...


Wednesday, November 15, 2023

3D Star Structure - Greens


I came across a class by Cherryl Moote and she had an interesting image... so I thought I'd see if I could make something similar.

Used Staples 110# white cardstock. Cut my star with the largest of a Spellbinder's Star die set (approx 3.75"). Doodled with a green Zig Writer.

Cut my stand pieces 3"w x 2"h, folded in half and cut a slit approx 1" deep from the fold to toward the outside edge. Cut pieces of one of my green design geli papers and adhered to each leg. 


Tuesday, November 14, 2023

Xmas Ball Ornaments


I've been getting a lot of paper crafting images on Instagram and decided to play a bit...

The upper left image is from
IG: giftwrappinglove

The lower right image is from
IG: christmas.studio.viki

Honeycomb ornament upper left ( image)
size: approx 2.5"w
Using 65# cardstock (white and a 2 toned pink scrapbook paper).

Cut 10 circles of white and 10 of pink 2.5" dia. I Used a Spellbinder's Nestabilities Standard Circles Large.

Since I used a 2 sided cardstock for one of my 10 circles I alternated the colors when assembling.

Fold all circles in half. Arrange in the order you will be gluing. Glue half of one circle to the half of the next circle. Repeat till all are glued together.

Now is the tricky part...
Alternate gluing a small line on the top of one folded half, press together to adhere then on the next section glue at the bottom folded half. Alternate gluing at the top of one and then the bottom of the next to get the honeycomb look.
String a thread through the center adding beads or knots to prevent string from slipping out. Adhere with a glue gun.  

Christmas ornament
size: approx 2.75"w
Using 65# white cardstock adhered sticky glitter sheets in 2 colors. Cut 18 strips (9 of each color) approximately 3.5" long x 1/4"w. Cut a pointed end to both ends so there is less bulk when gluing down.

The center column is a cardboard cylinder made from  the glittered scraps approx 1.75" tall and about 10cm dia. with a top on both ends to adhere the strips to.

Adhere your strips to the bottom end spacing as best you can. Adhere a larger circle on the outside from the glitter cardstock. This is decorative to hide the ends of your strips.

Repeat to the top end. (as you can see mine are not spaced quite evenly...). Adhere another large circle. I forgot to put a hole and thread through that 1st circle so had to add the 2nd circle on top of it... I also used a glue gun in this area.


Monday, November 13, 2023

Paper Star Ornaments


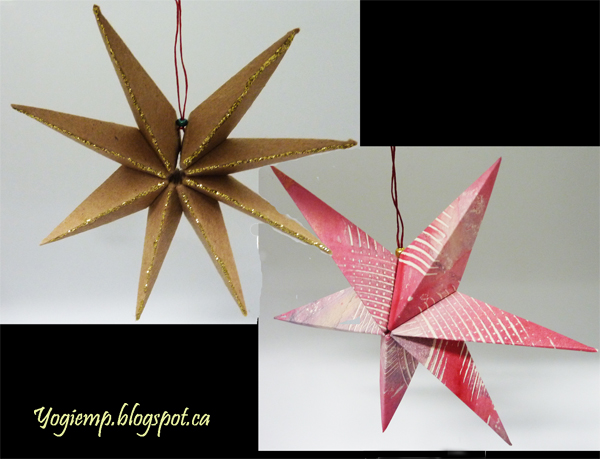
I've been getting a lot of paper crafting images on Instagram and decided to play with this shape... She's got 2 versions of making it, but I prefer the older version...
IG: easy_crafts.officialsize: 

approx 2.25"w
Using Bogus Recycled Sketch Paper.

Cut 8 squares 2.5" each. Fold in half point to point. Fold the left and right points to the half crease creating a pointed triangle shape. 
(a) Fold down the small triangle. (b) Fold the left and right points to the center fold. Put a small dab of glue to these points on the inner side and adhere to the triangle from (a). Make sure not to let glue go anywhere else.

Continue with other 7 pieces of paper. When all are assembled glue one to the other on the little glued outside triangle from (b)

I added an edge of Stickles gold glitter on each top edge. Adhere a string for hanging. I punched a small hole very near the edge of 2 of the star points and added a bead to hold it closed. It can still be folded closed as a thick triangle to put away.  


Geli Print Star Ornament (6 points)
size: approx 5.5"w

Using Columbia Mills End Paper geli printed. Cut 6 squares 4" each square.
 

Saturday, November 11, 2023

Paper Snowflake - Parchment Paper


I've been getting a lot of paper crafting images on Instagram and decided to play a bit... This one was on
IG: origami.studio.diy

Using parchment style paper and adding a gem to the center.

Cut a piece of paper (rectangular). Mine was 8.5 x 11". Accordion fold in half from the bottom of the 11" length, each half in half until you have 16 folds.

Open the folds. Fold in half horizontally (you have 8 folds showing) then fold vertically in half. Place a pencil dot at the mid point of the 4th fold line from the folded edge, then at about the 1/4 point from the top edge on the 6th fold and then at the half point on the edge of the last fold. Cut through all layers from the top of the folded edge to your 1st pencil point at the 1/2 mark on the 4th score line, then to the 1/4 point point and then to the outside edge.

Open completely and refold accordion style and fold that in half. Repeat with 3 more of these accordions. Adhere one half edge to the next accordion at the small half edge. Repeat till all four accordions are adhered.

Add a decorative gem or bauble and a hanging string.

I just knotted a piece of string and adhered it to the inside of the tall fold line.

Wednesday, October 25, 2023

Accordion Box - Multi Color


One of our Art Of The Fold members gave us a link to this structure for our next meeting. It's cute...

Instructions HERE

Made from various colored copy paper. Opens to about 5.5"w x 4"deep x 2.5"h. Each is made from an 8" x 8" piece of paper.

Tuesday, April 4, 2023

Helen Hiebert - Fun Fold


I took a mini ZOOM class with Helen Hiebert and her demo was this fun structure. Depending how you fold and adhere the ends etc you can get different effects. 

The ring is a fun way to use this fold although Helen created her ring with circles instead. I thought it would also make a really nice napkin ring for a fancy dinner or something if made a little larger...

Click on image for more details etc. Enjoy

Wednesday, March 22, 2023

3D Circle Fold - Cantaloupe

3D Circle Fold - Cantaloupe, this one done with 5 circles, the white one with 6 circles. Both are the same diameter

Click on image for more details etc. Enjoy

Tuesday, March 21, 2023

Art of The Fold No 33 - Star Box - Bloom


Art of The Fold No 33 - Star Box - Bloom. As mentioned I wanted a more square type of box... Love this one...

Click on image for more details and dimensions for creating a more square box. Enjoy 

Sunday, March 19, 2023

Art Of The Fold No 33 - Star Book - This n That


Art Of The Fold No 33 - Star Book - This n That. This one was fun... Our next meeting is April 11th. 

I'm trying to make one more square. I made a prototype for it, but it needs a couple of little adjustments... Hopefully I'll get to it tomorrow.

Click on image for more details etc. Enjoy

Thursday, December 22, 2022

Flower Folding


I came across this flower structure by Katharina Ostenda on kalligrafenkring fryslan facebook. She had really good clear images so I was able to replicate what she did. Thanks you.

Click on image for more details, images and instructions. Enjoy

Wednesday, December 14, 2022

HH - Cube/Tea Light


Helen Hiebert is having a 1 hour FREE ZOOM workshop tomorrow (Dec 15 at noon MDT). Some of that hour will be in creating this cube/tea light... She sent the diagram when we registered. I decided I was lazy... ROFL and converted it to cut with my Silhouete Cameo machine...

Click on image for more details etc. Enjoy

Thursday, August 4, 2022

BVCG Sept 2022 Galleria - 3D Ampersand


Our Guild's next galleria is "Ampersands". At our recent garage sale we picked up a craft papered 3D ampersand. I painted mine and embellished it...

Click on image for more details and larger images. Enjoy

Monday, July 11, 2022

Slip Knot Booklet - Friendship HB


And another booklet is finished... and I'm really pleased with the way it turned out... This one is with 3D frames

Click on image for more details, larger images etc. Enjoy

Thursday, March 31, 2022

Art Of The Fold - Booklet Fold #24 - Happy B.Day


Art Of The Fold - Booklet Fold #24 - Happy B.Day. As you can gather this is another of the structures from this book that I really love...

I probably won't do it with the back vases again...

Anyway click on image for more details and larger images etc. Enjoy